Sunday, December 15, 2013

Sorting Activities Build Addition Fluency

Freebie!

It's almost January and sooner than we know it, both teachers and students will be back in school.  The beginning of January is often a time when skills taught in the fall are reviewed.  This is necessary because while they were away from school, they started to forget a few things.  January is also a time to get back into a routine.  That's hard for some children!  They've been sleeping in for an extra few hours every day and perhaps they are running . . . um . . .  their own "daily schedule".

I received a set of clip art from Graphics From the Pond during one of her flash freebies this past week.  We had some snow days so I used her freebie graphics to make an addition fluency builder.  I decided to make it the third of my "Home For the Holidays" freebies.  If you want the other freebies from this promotion, you'll need to scroll through the past few posts to find them.
Students cut out addition sentences on the broken lines.

This packet has addition sorts for the children to practice speed and accuracy with.  I made the activities for sums from 3 through 20 with graduated degrees of difficulty from one sheet to another.  First the children cut out the addition sentences.  Then they sort them with the appropriate sum.  They can glue the addition sentences to the appropriate groups as well. 
Students sort the facts prior to gluing.

Students can affix the addition sentences with the appropriate groups after the sort is completed.
Here's a close up.
I added a few pages (one is shown below) that could be used in place of the numerical sorts. Those pages might work with students that need additional practice with pictorial representations of the addition equations.
This student is coloring in "snowflakes" to represent an addition equation with the sum of nine.  She will use another color to represent the second addend.  This method provides her with a pictorial representation of the addition equation.
Students can use two colors to color the snowflakes to create a visual representation of the addition fact.

 Here is a brief video about the addition sorts.
As I mentioned earlier, it's hard for students to get back into the routine of school when they return in January.  They've been on holiday for two weeks and now they have to go to school for seven or more hours!  One thing that can help make it easier for them (It's easier for teachers too!) is to incorporate games into the instructional day.  With this in mind, I added two games with this packet.  The first game is called, "Let's Play Snowflake Pie".  First the students color each piece of pie a different color.  The student directions specify the colors to use.  It does not matter which piece is colored pink, blue, etc . . .   You'll want to have them color lightly so the sums printed on each piece of pie remain visible.  The teacher uses the calling cards to call out a color along with the sum.  Students that have both the color and sum called out will stand up and recite an addition sentence that is equivalent to the sum.  An example might be to say, "Blue twelve".  Students with a "Blue twelve" stand and recall an addition sentence that will work with the equation.  I intended this game to have no winners or losers.  There is no end to the game until the teacher calls time.  There are two snowflake pies so the children can practice adding with both odd and even sums - depending on which pie you choose to use in a given day. 
Each piece of "pie" must be colored by the students. A total of six colors are used. The teacher calls out colors and numbers. If the student has a piece of pie with the color and number called, he/she stands up and recites an addition fact to go with the sum. (In the picture shown above, if the teachers called out "Orange 7" the student would stand up. However, he would not stand if "Orange 5" was called since he does not have that slice of pie.) Warm up the facts for a few minutes before starting the game.

The other game is called, "Eating Snow!"  The are eight unique "snow pies".  Each player gets one of the "snow pies".  This game is ideal for small groups but could also be played with the whole class.  When playing with the whole class, some students will have duplicate sheets and there will be multiple winners.  "Eating Snow!" is a game of chance and not one of skill.  In this game, the teacher calls out an addition sentence but omits the sum.  The students look and their pie pieces to see if they have the sum.  Those that have the sum turn that piece of pie face down.  The winner or winners are the first students to "Eat Snow" - that is, they eat their whole pie before anyone else.
Students cut around the solid black line. Then they cut on the broken lines in the center.

Students turn the pie pieces face down when they have the sum to an addition problem that is called out. The first student(s) that have all their pieces turned over are the winners. The teacher checks to see that the sums covered on the pie pieces are ones that matched problems used.

Want to try this freebie?  Click the image below:

https://www.teacherspayteachers.com/Product/addition-facts-1073480


Lessons by Molly © 2013  All rights reserved.


Monday, December 9, 2013

Winter Bingo For Children

One of the science Standards of Learning (Adopted in 2018) for first graders in Virginia is to investigate and understand the seasonal changes in our environment (Science SOL 1.7). I listed a few ideas on this topic at the end of this post.

This winter bingo game might fit your instructional needs if you plan science lessons about the four seasons. This game would complement a winter-themed unit for those in the northeastern United States. The game helps review winter vocabulary words and sparks interest in learning more about winter at the beginning of a lesson on seasons. I created a black-and-white version as well as a color edition product. Here are a few pictures from the color version of my "Wintry" bingo game.


A "Free Space" is in the center of each card, and twenty-four winter vocabulary words are displayed. 

 
Use pennies or other small objects on the bingo sheets instead of chips if you like. Sometimes it takes work to find bingo chips in local markets. I ordered mine through eBay.


The photo shown above is from the black-and-white version of the game. The words used with the black-and-white version are the same as the color version. A paint dauber is being used instead of bingo chips.
I used mini erasers as bingo markers in the photo shown above. They came in a holiday variety pack of 100 at Dollar Tree. I pulled out the snowflakes and kept the holiday-themed pieces for my "Santa's" bingo game. One pack of 100 mini erasers will be enough markers for five students.
I wanted to use a wintry mix of winter words to include the following categories:

1. Clothing Worn
2. Tools Used
3. Recreational Objects  
4. Animal Behavior (in response to winter)
5. Plant Behavior (in response to winter)
6. Forms of Precipitation 

Winter Words Calling Cards
Cut the calling cards out (shown above), shuffle them, and use them when the game is in play.

Here are a few discussion ideas about winter:


1. We observe how climate affects plants and animals. - The green grass has turned brown. The leaves on the deciduous trees have fallen off. The robins are flying south (we see less of them than when we observed them in the spring). The squirrels are gathering nuts. The Monarch butterflies have migrated. The crops are harvested. There was no corn growing where the cornfields stood. No more fresh tomatoes are growing in our gardens. 


2. We discuss sudden and gradual changes. - There is a drop in temperature from arrival at school to departure time - or the reverse. The diminishing leaves on the trees nearby take many weeks to change from green to red and then to a dormancy phase. We have fewer hours of daylight - it gets darker earlier. 


3. We compare one season with another. We talked about the change in our dress for school from August to December, such as wearing shorts when school begins in August to wearing long pants, sweaters, and jackets in December. 


4. We talk about the changes in our activities. We consider the sports people play in the summer, like baseball and swimming. We compare indoor sports such as basketball and ice hockey. We talk about the kinds of tools our parents use in the winter, such as shovels and ice scrapers. We compare those with things used in the summer, such as lawnmowers and bug spray.


The possible discussions are almost endless!

If you are interested in purchasing my "WINTRY" Bingo game, click one of the images shown below.

Lessons by Molly © 2013  All rights reserved.
  
https://www.teacherspayteachers.com/Product/winter-activities-1002499
https://www.teacherspayteachers.com/Product/winter-activities-1005131


Sunday, December 8, 2013

Spell S-A-N-T-A with Peppermint Letters

I wish I would have had the time to post this a bit earlier than now.  Perhaps someone can still use these for a holiday program, Christmas decoration, or other activity.  This is the second freebie in my "Home For the Holidays" promotion.  To get the freebie, scroll down to the bottom of this post.  Update December 2014:  I have changed the green background pages and the cover page. 

Recently I visited a website called fontspace.com   It has tons of fun fonts.  I found one that looks like a candy cane or peppermint stripe.  I used it to make images with large letters that spell the word "SANTA".  I did a little funky editing with the green background achieve the look I wanted.  There are two sets of "SANTA" letters.  One set has a white background and the other set has a green background.  The set with the white background will be a tad more ink-friendly on the printer.  If time is short, the set with the green background doesn't require cutting or mounting the letters.  Below are the directions and photos of the project.


METHOD 1  White Background Letter Set:

1.  Print the five pages to spell "SANTA".

2.  Cut out the letters.

3.  Adhere one letter on one piece of green construction paper or other specialty paper.

4.  Repeat step 3 for each of the remaining letters. 

5.  Laminate if desired.

Print the desired letters. (Method 1)


Cut the letters out. (Method 1)
This is how the letters appear after they are cut out.
Mount the letters on green construction paper or on specialty paper. (Method 1)
METHOD 2  Green Background Letter Set:

1.  Print the five pages to spell "SANTA".

2.  Laminate if desired.

Now you have "S-A-N-T-A" letter cards for the children to hold during your holiday program!  It's a good idea to mark the back of the letter cards with adhesive dots.  Put one dot on each side.  This helps the child know where to position his/her thumbs when holding the cards.

These are the letters with the green background built in to the page: 
Each of the letters above prints on a full size sheet of paper.

To get this freebie click on the words, "We Can Spell Santa!".

Lessons by Molly © 2013  All rights reserved.

Thursday, November 28, 2013

Subtraction "Home For the Holidays" Freebie

Update 2019

Sorry!  The freebie from this post has been removed.  Please skip this post and find another one!

I hope you had a great week at school albeit a short one.  I am home for the holidays and plan on enjoying some turkey, mashed potatoes, gravy, stuffing, and a slice (or two) of pumpkin pie.  It's nice to have a few days off to recharge my "batteries" and get a few things done that I have been neglected recently . . . like dusting.  Yeah!  One thing I will pass on is the maddening "Black Friday" sales that are now more like a "Black Thursday" sale.

Here is a subtraction freebie I made for you and your students.  I call them "subtraction function tables".  Students subtract horizontally and vertically.  This is intended as a mental subtraction exercise to build subtraction fluency.  (There are no equals of minus signs.)

They can be laminated and a dry/erase marker can be used to write and wipe the answers and the same can be done with sheet protectors.  I prefer that the focus is on the mental math aspect of the activity so we use the numeral cards with Velcro fasteners.  This method allows the children to focus just on the math and not on numeral formation.  It's a bit more self-checking when the correct numerals are presented for the students.  Ashley Hughes made the graphics that I used for this center.  I love her artistic flair!  Visit her Teachers pay Teachers store at Ashley Hughes.
Here's a shot of the finished product.


There is a student response sheet so the center work can be documented.
Print each of the sheet and laminate.  Then add the Velcro coins.  No cutting! 
1.  Print, cut, laminate, and cut again.  2.  Put Velcro coins on the backs of each.

Here's an answer key so students can check their own work. The letters in the top left corner of each function table correspond with the card names . . . "A, B, C, D, E, and F".
   

Happy Holidays!

https://drive.google.com/file/d/0B-I90irRe2FHOUlFcjRjOEpHdFE/view?usp=sharing
Click on the picture above to get this freebie.


Check back here again soon for more "Home For The Holidays" freebies!  The pretty frame shown above was made by Krista Walden.  Visit her TpT store at:  Krista Wallden

Lessons by Molly © 2013  All rights reserved.

Saturday, November 23, 2013

Santa's Bingo

I've seen some teachers collaborate when organizing their special holiday events.  Within a grade level, each teacher plans one craft, snack, game, or other activity.  The children rotate from one classroom to another during their celebration.  One teacher is responsible for one activity.  He/she repeats the activity for each group of children within the grade level.

This is a great way to reduce everyone's work load during the busy holiday season.  It also gives the children a chance to visit other classrooms and it's fun for the kids.  Bingo games are an easy, no-mess, activity that could be used for this purpose.

This post showcases my "Santa's Bingo" game.  I wanted the game to be practical for a variety of school situations as well as to have educational merit.  This influenced the type of words I used. 

The black and white option is great for immediate use.  The words could also be cut out by the children and used for word sorts after playing the game.  The children can color the pictures with the black and white bingo game if time permits.  Here are a few pictures from my "Santa's Bingo" games.


There are 25 unique bingo cards.  Each bingo cards uses the same 24 words.  The center space is the "free" space which has a Christmas themed graphic.


Students can mark their cards with paint daubers, bingo chips, math cubes, coins, mini erasers, or anything else that can fit within the squares.


The bingo cards print on a full sheet of paper.  (8.5 inches x 11 inches) 


The color version of the game could be laminated for repeated use over several years.


I used seasonal erasers from the Dollar Tree as game markers in the photo shown below.


I used common nouns and proper nouns for the words in "Santa's Bingo".  There is also a mix of singular nouns and plural nouns.  Two adjectives (the word red and the word green) were also used.  If you'd like ideas about word sorting with this bingo game, read on after the product covers shown below.

Click on either product cover if you are interested in the black and white or color version of the games.  


https://www.teacherspayteachers.com/Product/Santa-Bingo-for-Holiday-Event-or-Party-Black-and-White-Version-981251
 

Sort One - Singular Nouns and Plural Nouns:  

This sort is for 20 of the 24 words in the bingo game.  Remove the words green, red, North Pole, and candy cane.  If your students are cutting out the words from the black and white bingo sheet, have them throw away those four words.  If your students are doing the sort on the board, have students cross out those for words from their bingo sheet.  
Singular Nouns:  tree, ornament, Christmas, December, Santa, sleigh, holiday, star, wreath  
Plural Nouns:  elves, stockings, carols, candles gifts, toys, bells, lights
Singular and Plural Nouns:  tinsel, garland, reindeer

Sort Two - Common Nouns and Proper Nouns:

This sort is for 22 of the 24 words from "Santa's Bingo".  Discard the two adjectives which are the words red and green.  
Proper Nouns:  Christmas, Santa, December, North Pole.  
Common Nouns:  All the other words!

Sort Three - Number of Syllables:

This sort uses 14 of the 24 words from the bingo games.  None of the 8 plural nouns are used in this sort.  Additionally, the words candy cane and North Pole are not included in the sort.  
1 Syllable Words:  sleigh, red, tree, green, wreath, star.  
2 Syllable Words:  Christmas, tinsel, Santa, garland, reindeer.  
3 Syllable Words:  holiday, ornament, December.

Sort Four - Nouns and Adjectives:

This sort uses all of the 24 words from "Santa's Bingo".  
Adjectives:  red, green
Nouns:  All the other words!


Lessons by Molly © 2013  All rights reserved.

Wednesday, November 6, 2013

Teaching Measuring Weight with Non-Standard Units

Last week was super busy!  I don't know if Halloween and "trick or treating" that has me tired or if it's just the time change along with the fluctuation in temperature. 

At the first grade level in Virginia, we use non-standard units with the measurement strand of the state standards for measuring length,weight, and volume..  While the balance scales are great for weighing small items, they're not useful for big things such as pumpkins.  This year I wanted to see if I could create something to measure a large object such as a pumpkin.

I used a shelving board for my beam and put a patio block below it. I took a large bag of rice and divided the rice into equal portions in plastic bags. I had six bags of rice in all.  The rice became my non-standard units for measuring the weight of the pumpkin.  I put the pumpkin on one end of the beam and one bag of rice on the other end. The pumpkin's weight was more than one bag of rice which caused the beam to tip to the left as seen in the first picture. Then I put a second bag of rice on with the first bag of rice. This seemed to cause balance as seen in the second picture.  
The pumpkin's weight was more than one bag of rice.
The pumpkin appeared to weigh two bags of rice.  This was not exactly correct!


Finally, I added the other four bags of rice on to see if the weight would cause the beam to tip over again. It did not tip.  I determined my teacher-made seesaw was an inaccurate measuring tool. Nonetheless, it did tell us that the pumpkin was heavier than one bag of rice! Perhaps I should have used smaller units of rice per bag to cause more measuring to take place.  I was wishing for one of those old playground seesaws to test this out more but we don't have them in my location. 

Some children have exercised with "teeter toys".  When using a "teeter toy", you place one foot on each side and then shift your weight from the left foot to the right foot to cause the "teeter" to rock.  While a bit abstract, perhaps a few children could make the connection between the similarities of how the balance worked and that of a teeter toy.

I would love to hear your ideas about how to create a simple device that could weigh large objects with non-standard units.  It can't be too technical or require a lot of carpentry skills though.  Please share!

Lessons by Molly © 2013  All rights reserved.

Sunday, October 27, 2013

Halloween Apples For the Teachers . . . It's A Treat Without a Trick!

Hello everyone!  I hope you're geared up for the last week of October.  It's "Trick or Treat" time so I made some free teaching resources for you.  I'm sending you the treats without any tricks.  The teachers' "Halloween Apples" have arrived! 

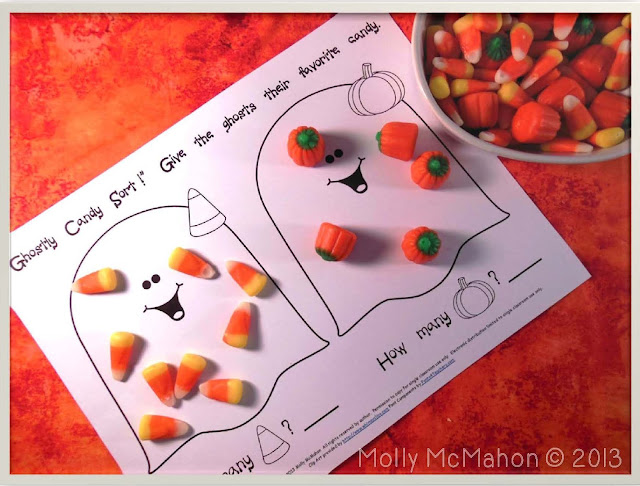
The first activity is for pre-kindergarten and kindergarten.  I love creating sorting activities for students to use.  I like using things the children can manipulate in their hands.  It's an effective way to present math activities . . . especially when introducing a new concept.  We used the candy corn and the "Mellowcreme Pumpkins".  (Visit the Brach's Candy website and go to the link that says "Halloween Candy" to see what I'm referring to.)  Each child gets a small, plastic sandwich bag with some of the candied pumpkins and the candy corn inside.  I program the amount so that each child has about 5 pumpkins and 8 candy corn pieces.  The children sort the candy into two groups - one group for the pumpkins and the other group is for the candy corn.  This year I made a sorting sheet to go along with the activity so the children could sort directly on the sheets and record their results.  Below are some of the photos of how it's done.
Happy October!  Here is a free sorting activity with two of the friendliest ghosts you've ever seen!  Give each child a bag of candy corn to sort.  You'll need the pumpkin shape variety as well as the traditional type of candy corn.  Students sort the candy corn into the two groups as indicated by the image on the ghosts.  Then they count the candy corn within each group and record the number.  No reading is required for the sorting activity!
Students sort the candy corn and pumpkin shaped candy into two groups.


http://bit.ly/SpookyCandySort
The children draw to record the candy corn and pumpkin candy on the sheets with their crayons.  This represents the amounts of each they received.  Click on the picture shown above to get this sheet!  To get the British spelling version, click here:  Ghostly Candy Sort!  British Spelling.  
The remaining activities are for first and second grade.  You'll need the books to go with these.  There's a link at the end of this post of where you can acquire them.

We had a read-aloud for the story titled, The Teeny-Tiny Woman by Paul Galdone.  Are you familiar with this ghost story?  It's such a fun story to act out and have all the children shout, "TAKE IT!" at the end.  The main character in the story, the teeny-tiny woman, learns an important lesson: 


Don't Take Things That Belong To Someone Else.  

If you've heard the story before, you might be aware of another moral in the story which is:

Perseverance Yields Results.

Hmm. . . could it be that the little voice which kept saying, "Give me my bone!" was nothing more than a little dog wanting what was rightfully his returned to him?  Maybe we should say:

"Dogged Effort Wins Out in the End."

That's a lesson both teachers and students can use!

I don't want to miss this opportunity to evaluate listening comprehension.  I want to know who was tuning into the story and who had their thoughts elsewhere.  It's time prohibitive to ask each of the students a question about a read-aloud.  What usually happens is that a handful of questions are asked with a few of students called on to answer.  Information about the majority of the students' listening comprehension on a given read-aloud is unknown.  I've started to make quizzes to check listening comprehension after a read-aloud.  This way, I can measure all students' listening comprehension instead of just a few.  I used a multiple choice format to make the quizzes.  The quiz has ten questions.  However, the quiz can be reduced to five questions by eliminating the second page.  Since I'm measuring LISTENING comprehension and not READING comprehension, I read the questions and the answer choices to the students.  You can see the preview below.

If you'd like a copy of my quiz for, The Teeny-Tiny Woman by Paul Galdone, click the image shown below.
http://bit.ly/GIVEMEMYBONE

In order to compare and contrast one ghost story with another we also read, The Little Old Lady Who Was Not Afraid of Anything by Linda Williams.  If you're familiar with this story, you know that the beginning is the same as The Teeny-Tiny Woman with the main character being a woman that is going for a walk.  In Linda Williams's story, clothes and a pumpkin head make sounds and follow the old lady while she takes her walk.  Eventually the clothes and pumpkin head reveal to to the little old lady that they want to be frightening.  In fact, they are quite frustrated that they couldn't scare the little old lady.  The clever little old lady finds a purpose for the clothes and pumpkin head.  This turns out to be mutually beneficial to all . . . except for a group of crows!  Below are the pages from my quiz for The Little Old Lady Who Was Not Afraid of Anything.

If you would like my quiz for The Little Old Lady Who Was Not Afraid of Anything, click the image below: 
https://drive.google.com/file/d/0B-I90irRe2FHc0JPWFVCWWg5R2M/view?usp=sharing
Here are the links to where you can get the books:
The cute image graphics of the bone, ghost, candy corn, pumpkin, and jack-o-lantern came from www.whimsyclips.com

© 2013 Lessons by Molly.  All rights are reserved.